What you need:
–2 long rectangles of fabric. I use cotton and poly/cotton blend jersey knits which are more soft, but almost any fabric you would want around your neck should work
–thread that is the same color as one of your fabrics
–hand-sewing needle (don’t be scared!)
My rectangles are about 60″x18″ each which will create a long scarf looped once but also enables doubling. simply adjust the length if you’d prefer a shorter/longer scarf and adjust the width of this rectangle if you prefer a chunkier/thinner scarf. Just compare the look you want to my finished product on me (i am 5’7, FYI).
FABRIC OPTIONS:
1. Upcycling/Recycling: You can pull this project off for FREE by using a big t-shirt to create each rectangle (you’re probably going to need a XL or larger. Of course: you can always take a few shirts’ fabric and piece them together to get the dimensions we need.
cutting along the red dotted lines at the indicated measurements will create a 2-ply (front and back of the shirt) circley-loop that is 15″ high and close to 60″ around. you will cut one of the sides (if there was a side seam on the shirt, cut there to eliminate it) to get an open rectangle of fabric.
2. Buying Yardage
Another option for fabric is to just use yardage from a fabric store. Jersey knits off of a bolt are typically 58″ wide. this means that your rectangle’s long edge is accomplished by the width of the fabric straight from the bolt, so you only need to order/have cut around 18″ of each color. Fabric.com has an awesome selection of jersey knits AND they have free returns, if you’re like me and need to feel your fabric before committing!
I try to stick with cotton or poly/cotton blend jersey, and this Robert Kaufman Laguna collection is excellent and comes in tons of colors, and works out to less than $10 per scarf.
I like the feel of the interlock fabric off the bolt better than t-shirts, but it’s totally up to you! Several readers have sent me pictures of scarves they made from their old t-shirts and they totally rock. it’s your world….have it your way.
Fabric PSA complete. We now we return to your regularly scheduled tutorial.
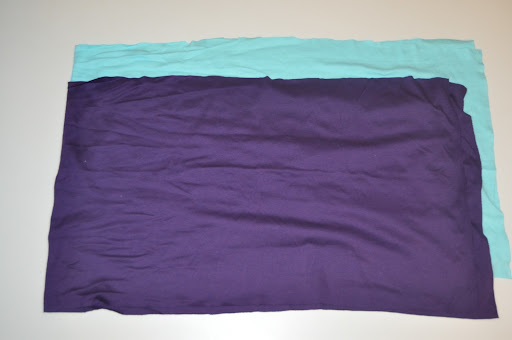
So whatever you did to acquire/create/procure/piece together your approx 60×18″ rectangles, you now have your two long rectangles (folded width-wise here because i’m dumb like that)
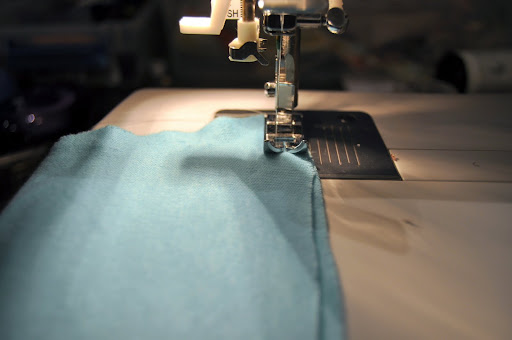
STEP 1: fold each rectangle lengthwise (aka not like above), matching up the raw longest edge and keeping right sides together if you have a fabric that has a non-patterned side. Sew with a zig-zag stitch or serge along the long side, backstitching at each end to anchor if sewing:
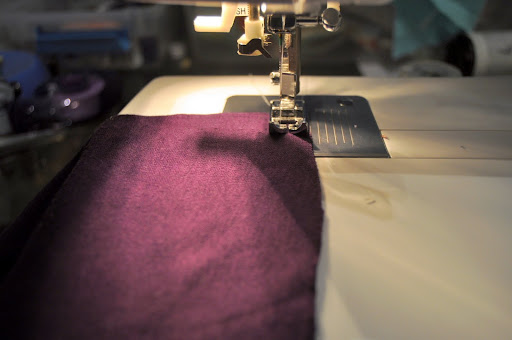
Repeat for the other rectangle/fabric:
STEP 2: reach your arm inside each rectangle and turn rightside-out. Don’t press these seams because we are going for tubular not squashed, remember. Gotta love a step that forbids ironing!
The resultant two long tubes of fabric.
STEP 3: make your braid. it can be difficult to explain so I have attached pictures of the process and a really quick video of me doing the knots (in which I show what a HUGE nerd i am at the end and Jesse patronizes me silently while taping)
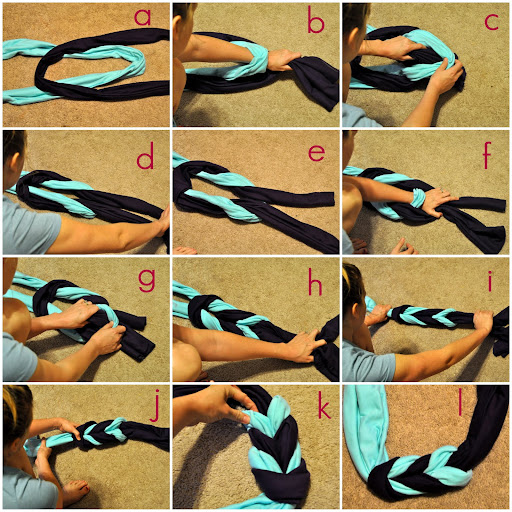
a: make two loops by folding in the middle of each tube- overlap them on on top of the other. b: reach your arm under the crook of the bottom (blue) loop and grab the ends of the top (purple) loop. c: pull the ends of the top loop back through the crook of the bottom and lay them on top of the bottom crook. d: cinch and straighten making sure the knot is in the middle. e: spread the ends of the top loop out and away from each other. f: reach between the top ends and under the bottom crook to grab the tails of the top ends. g: pull the top ends back through the bottom loop. h: pull through to lay them over the bottom loop. i: pull all four ends to cinch the knots tighter j: squnch and shift to make your knots compact. k: twist and adjust and do what you need to to make the knots uniform and pretty. l: admire!
NOTE: you can repeat the steps as many times as you like if you want your knot/braid to be longer. these steps make a braid with 3 sets of V’s (just like the inspiration scarf), but you could make as many as you like. just keep in mind that every additional V makes your total length a bit shorter.
Now we are going to sew the tubes together for our completed scarf. we want to keep the tubes open on the interior so the layers aren’t all squashed together. we are going to sew in the manner you may have used if you have made a reversible garment before. we have to sort of sew our way out of the fabric. here’s how–
STEP 4: lay out your finished knot into an X shape. match up the top tails of the X (one from each side/color), bringing the raw circular ends together. you can add in a few twists on each individual tube before matching the ends up to give your finished scarf that twisty swirly look rather than just a straight loop (i didnt twist mine so you can compare that look to the yellow and gray one which was twisted…i will twist next time!).
Top raw tails together, bottom raw tails together. onward to step 5!
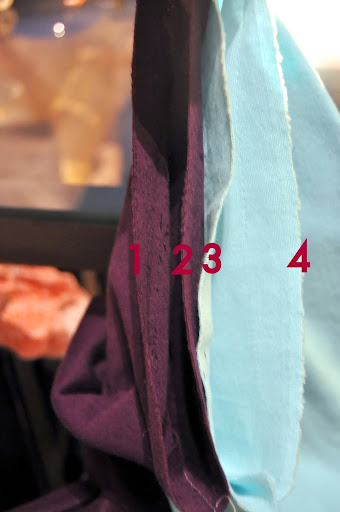
STEP 5: find the seams from when you created your tubes in STEP 1 and align them side by side:
nice bandaid…hey, guys rotary cutters are mother flipping sharp. fiskars don’t play.
*DOUBLE BRAIDERS PICK BACK UP HERE
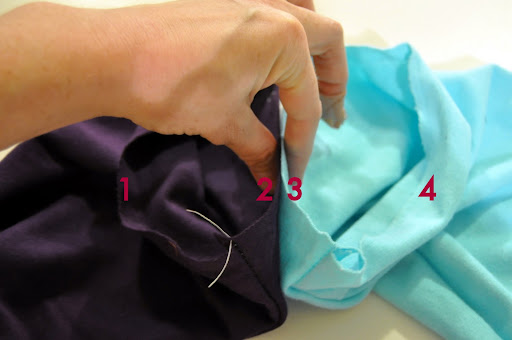
So here are your two raw edges that you have matched up. for reference, I am going to call each layer of this little pita pocket by a number:
STEP 6: pinch the two inner layers together (keeping that long seam aligned…see how mine are both at the bottom?)
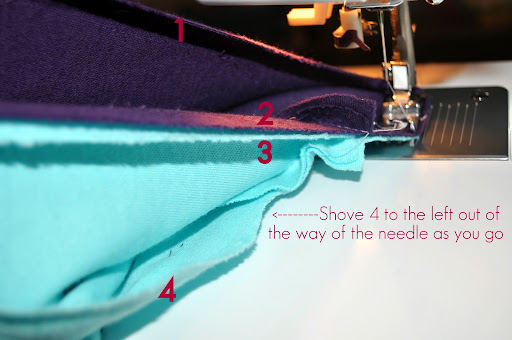
STEP 7: Take your pinched together 2 and 3 layer and put them under your presser foot. start sewing, taking care to keep layers 1 and 4 away from the needle and out of the way:
Now since these are tubes, we are dealing with circles, so as you go, what was your 1 and 4 layers, start to come around to the middle and become your 2 and 3 layers that you are sewing. That’s okay, keep going:
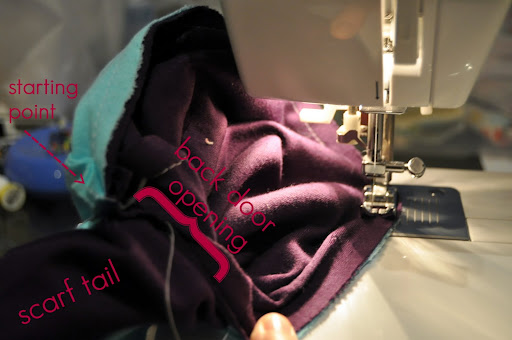
You can see on the left below where I started stitching. it is coming back around and I am starting to run out of room. What we have done here is essentially sew a small portion of the ends of these tails inside out. You wont be able to complete the circle of stitching because the back door has to remain open for the rest of the scarf to go out of:
STEP 8: you will start really running out of room running up against the long tail of the rest of your scarf. Just go as far as you can WITHOUT stretching the fabric and then backstitch at your stopping point:
When you snip your threads and remove from your machine, this is what you will have: a little almost-circle stitched around the ends and turned inside out around the remaining material. A tortellini of fabric spewing scarfy goodness:
STEP 9: flip the end right side out:
REPEAT STEPS 4-9 with the other two raw ends of your scarf
Tta-da: you have successfully sewed 90% of your tube circumference with an awesome invisible seam:
But there’s the 10% you couldn’t quite reach (see how my blue has more length at the hole than my purple…it’s because i got greedy and did a no-no and stretched my fabric back on step 8. this is why you shouldnt do that…sadface):
STEP 10: We hand sew the little openings closed. grab some coordinating thread and a need and blind stitch that puppy closed.
Mine is wonky on the blue because my open ends weren’t even– due to my truancy in step 8 Yours will be more perfect:
That’s it! you’re done


